Spring Security can give an application a secure baseline before you write any custom configuration. Its default filter chain protects every request, provides a form login page, and enables HTTP Basic authentication. That setup is useful for a quick start, but as soon as user accounts need to live outside application memory, you will replace parts of it. The path below starts with the default behavior, moves to an in-memory user, then uses MyBatis-Plus and SQLite to authenticate against a database and add new users.
The default filter chain
@Bean
public SecurityFilterChain filterChain(HttpSecurity http) throws Exception {
    http
        .authorizeHttpRequests(authorize -> authorize
            .anyRequest().authenticated()
        )
        .formLogin(withDefaults())
        .httpBasic(withDefaults());
    return http.build();
}
The authorizeHttpRequests block sends all HTTP requests through Spring Security. anyRequest().authenticated() means every request must come from an authenticated user; unauthenticated visitors cannot reach any application resource. This is why the default configuration protects every endpoint, not just selected paths.
formLogin(withDefaults()) turns on form-based login. When an unauthenticated user requests a protected resource, Spring Security shows a standard login page. After a successful login, the user is redirected to the resource they originally requested. The generated page is often enough for basic needs and makes a quick startup possible.
httpBasic(withDefaults()) enables HTTP Basic authentication, where the username and password travel in an HTTP request header. This can be handy for basic protection of RESTful APIs, but using it alone in production is generally not recommended.
What the defaults are good for
- Simple startup: a developer can turn on security without diving into detailed configuration.
- Broad coverage: every endpoint receives baseline protection even with no custom rules.
- Flexibility: the defaults can be extended or replaced when requirements become more specific, such as a custom login page, different access rules, or OAuth2.
In-memory authentication
To define custom security, start with a Java configuration class. It creates the springSecurityFilterChain servlet filter, which handles application security: protecting URLs, checking submitted usernames and passwords, redirecting to the login form, and similar tasks. The example below is the most basic form of custom Spring Security Java configuration.
@Configuration // Configuration class declaration
@EnableWebSecurity // Enable custom configuration (can be omitted in Spring Boot projects)
public class WebSecurityConfig {

    @Bean
    public UserDetailsService userDetailsService() {
        // Create an in-memory user details manager
        InMemoryUserDetailsManager manager = new InMemoryUserDetailsManager();

        // Create a UserDetails object
        manager.createUser(
            User.withDefaultPasswordEncoder()
                .username("user")
                .password("password")
                .roles("USER")
                .build()
        );
        return manager;
    }
}
When the application starts, it creates an InMemoryUserDetailsManager, creates a User object containing the username and password, and stores that user in memory through the manager.
During authentication, the manager's loadUserByUsername method retrieves the user from memory. UsernamePasswordAuthenticationFilter's attemptAuthentication method compares the submitted credentials with the retrieved user information and performs authentication.
Database-backed authentication
Create the database
SQLite is used here. Add these dependencies:
<dependency>
    <groupId>com.baomidou</groupId>
    <artifactId>mybatis-plus-spring-boot3-starter</artifactId>
    <version>3.5.7</version>
</dependency>
<dependency>
    <groupId>org.xerial</groupId>
    <artifactId>sqlite-jdbc</artifactId>
</dependency>
<dependency>
    <groupId>org.projectlombok</groupId>
    <artifactId>lombok</artifactId>
    <scope>annotationProcessor</scope>
</dependency>
Create a SQLite database and a user table:
create table 'user' (
    id INTEGER primary key autoincrement,
    username varchar(255) not null,
    password varchar(255) not null,
    enabled boolean not null
);

create unique index 'user_username_uindex' on 'user' (username);

insert into 'user' (username, password, enabled) values ('admin', '{bcrypt}', true);
insert into 'user' (username, password, enabled) values ('user', '{bcrypt}', true);
insert into 'user' (username, password, enabled) values ('zfmx', '{bcrypt}', false);
The password must be a Bcrypt hash in the form {bcrypt}xxxxxxx.
Persist users with MyBatis-Plus
Using MyBatis-Plus basic syntax, the mapper and service are brief. Only the relevant parts are shown:
@Mapper
public interface UserMapper extends BaseMapper<User> {
}

@Service
public class UserServiceImpl extends ServiceImpl<UserMapper,User> implements UserService {
}
A test controller can verify the setup:
@RestController
@RequestMapping
public class UserController {

    @Resource
    private UserService userService;

    @GetMapping("/user")
    public Object user(){
        return userService.list();
    }
}
Before running the application, configure the datasource. For SQLite, for example:
spring.application.name=security-demo
spring.datasource.driver-class-name=org.sqlite.JDBC
spring.datasource.url=jdbc:sqlite:security.sqlite
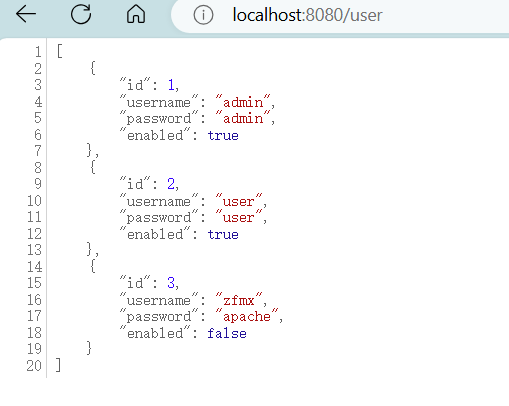
Visiting the API returns the user records.
Build a database-backed UserDetailsManager
The in-memory manager can be used as a reference, but this project uses MyBatis for persistence, so a JDBC-based manager is not the right fit. The class below implements the required interfaces and overrides the retrieval method; the rest uses default behavior.
public class DBUserDetailsManager implements UserDetailsManager, UserDetailsPasswordService {

    @Resource
    private UserMapper userMapper;

    @Override
    public UserDetails loadUserByUsername(String username) throws UsernameNotFoundException {
        QueryWrapper<User> userQueryWrapper = new QueryWrapper<>();
        userQueryWrapper.eq("username", username);
        User user = userMapper.selectOne(userQueryWrapper);
        if (user == null){
            throw new UsernameNotFoundException("用户不存在");
        }else{
            Collection<GrantedAuthority> authorities = new ArrayList<>();
            return new org.springframework.security.core.userdetails.User(
                    user.getUsername(),
                    user.getPassword(),
                    user.isEnabled(),
                    true, true, true,
                    authorities);
        }
    }
}
Enable the database-backed manager
Replace the in-memory bean with the database-backed one in the configuration. The commented block shows the previous approach; the active bean returns DBUserDetailsManager.
@Configuration // Configuration class declaration
@EnableWebSecurity // Enable custom configuration (can be omitted in Spring Boot projects)
public class WebSecurityConfig {

//    @Bean
//    public UserDetailsService userDetailsService() {
//
//        // Create an in-memory user details manager
//        InMemoryUserDetailsManager manager = new InMemoryUserDetailsManager();
//
//        // Create a UserDetails object
//        manager.createUser(
//            User.withDefaultPasswordEncoder()
//                .username("user")
//                .password("password")
//                .roles("USER")
//                .build()
//        );
//        return manager;
//    }

    @Bean
    public UserDetailsService userDetailsService(){
        return new DBUserDetailsManager();
    }
}
A shorter option is to put @Component on DBUserDetailsManager.
Authentication flow with the database
At startup, Spring creates the database-backed manager object, which implements UserDetailsManager and UserDetailsPasswordService.
During authentication, loadUserByUsername reads the user from the database. The attemptAuthentication method in UsernamePasswordAuthenticationFilter compares the submitted username and password with that database record to authenticate the user.
Adding users
Controller
To add users, create an endpoint in the controller:
@RestController
@RequestMapping
public class UserController {

    ...
    @Resource
    private UserService userService;

    @PostMapping("/add_user")
    public void addUser(@RequestBody User user){
        userService.saveUserDetails(user);
    }
}
The request body is converted to a User, and the service saves the new user.
Service
The default service interface has no saveUserDetails method, so add it to the interface and implementation:
public interface UserService extends IService<User> {
    void saveUserDetails(User user);
}
@Service
public class UserServiceImpl extends ServiceImpl<UserMapper,User> implements UserService {

    @Resource
    private DBUserDetailsManager dbUserDetailsManager;

    @Override
    public void saveUserDetails(User user) {
        PasswordEncoder passwordEncoder = new BCryptPasswordEncoder();
        UserDetails userDetails = org.springframework.security.core.userdetails.User.builder()
                .username(user.getUsername())
                .password(passwordEncoder.encode(user.getPassword()))
                .roles("USER") // Add user roles, or configure as needed
                .build();
        dbUserDetailsManager.createUser(userDetails);
    }
}
The implementation uses createUser from UserDetailsManager in DBUserDetailsManager. It also creates a Spring Security UserDetails object with the User class before saving.
createUser
@Component
public class DBUserDetailsManager implements UserDetailsManager, UserDetailsPasswordService {

    @Resource
    private UserMapper userMapper;

    ...

    @Override
    public void createUser(UserDetails userDetails) {
        User user = new User();
        user.setUsername(userDetails.getUsername());
        user.setPassword(userDetails.getPassword());
        user.setEnabled(true);
        userMapper.insert(user);
    }

    ...
}
The UserDetailsManager interface also provides other user-related methods.
Test the endpoint
Knife4j is used to send requests to the API. It is an enhancement solution for generating API documentation from Swagger/OpenAPI in Java MVC frameworks.
<dependency>
    <groupId>com.github.xiaoymin</groupId>
    <artifactId>knife4j-openapi3-jakarta-spring-boot-starter</artifactId>
    <version>4.4.0</version>
</dependency>
Open localhost:8080/doc.html to test the endpoints:
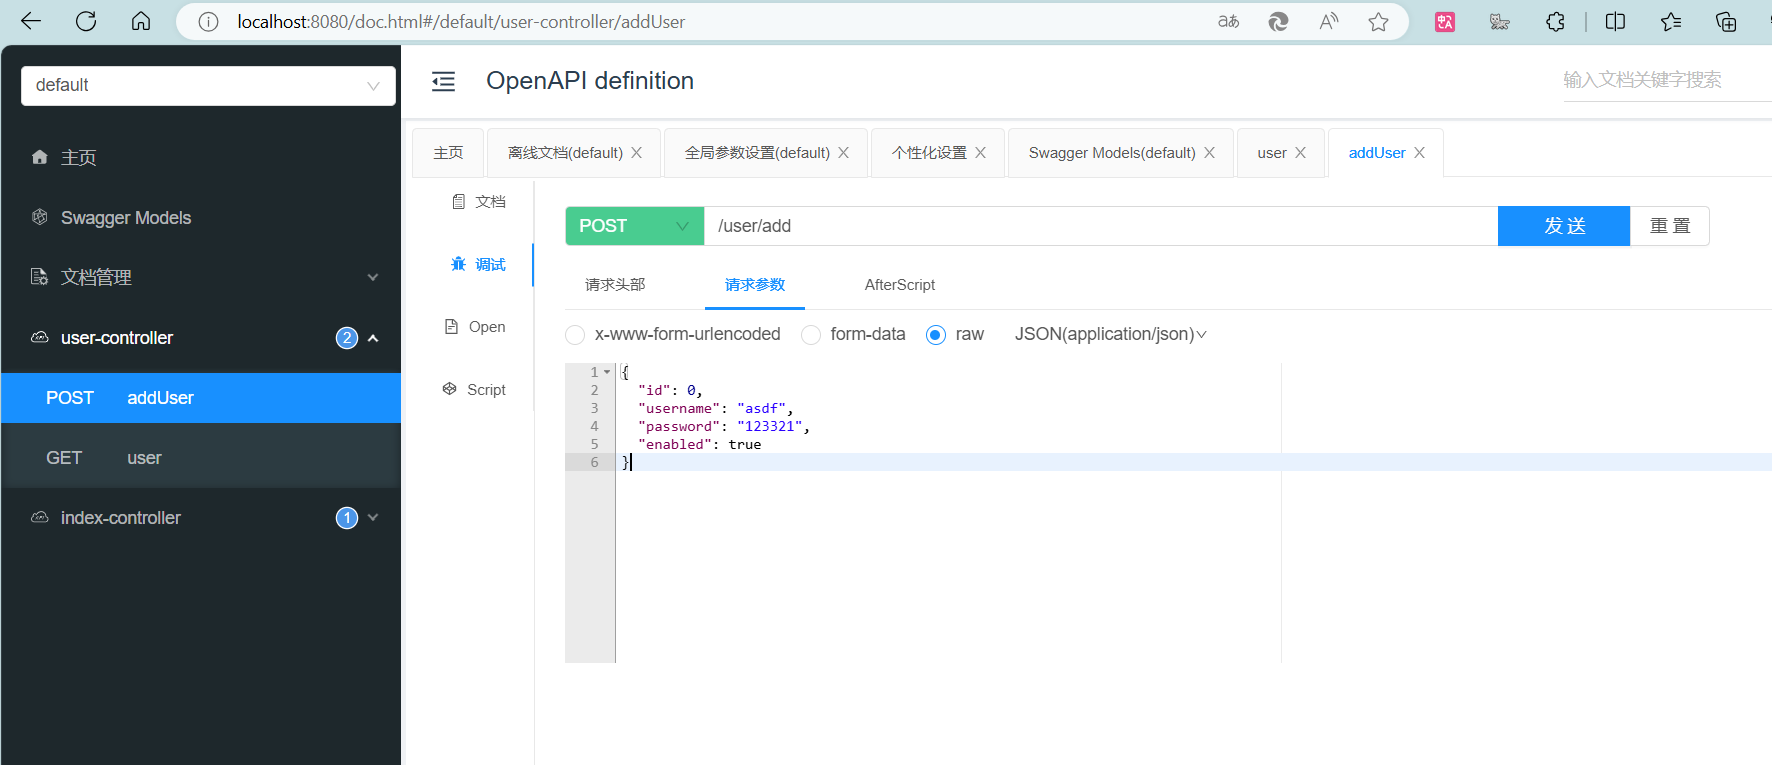
A direct test will run into a 403 authorization problem. For testing, disable CSRF:
@Configuration // Configuration class declaration
@EnableWebSecurity // Enable custom configuration (can be omitted in Spring Boot projects)
public class WebSecurityConfig {

    @Bean
    public SecurityFilterChain filterChain(HttpSecurity http) throws Exception {
        http.authorizeHttpRequests(
                authorize->authorize.anyRequest().authenticated()
        ).formLogin(Customizer.withDefaults());
        http.csrf(AbstractHttpConfigurer::disable); // Disable CSRF
        return http.build();
    }
}