
In the first half of this topic, the focus was on UTS, IPC, PID, and Mount namespaces, along with a rough container-like environment built by hand. The remaining two pieces are just as important to how Docker works in practice: User Namespace and Network Namespace.
These two areas are where container isolation starts to become much more practical. One controls identity and privilege mapping, and the other defines how a container gets its own network stack and reaches the outside world.
User Namespace
A User Namespace is created with the CLONE_NEWUSER flag. Once that namespace exists, the UID and GID seen inside it are no longer automatically the same as those on the host. If no mapping is configured, the process inside usually sees 65534 as its UID or GID. That value comes from the kernel’s overflow setting, defined in /proc/sys/kernel/overflowuid and /proc/sys/kernel/overflowgid.
To make the user and group IDs inside the container correspond to real IDs outside, two files must be written:
/proc/<pid>/uid_map/proc/<pid>/gid_map
Their format is:
ID-inside-ns ID-outside-ns length
The meaning of each field is straightforward:
ID-inside-ns: the UID or GID visible inside the namespaceID-outside-ns: the real UID or GID on the hostlength: how large the mapped range is; in simple cases this is usually1
For example, to map the host UID 1000 to UID 0 inside the container:
$ cat /proc/2465/uid_map
         0       1000          1
Another example maps the namespace’s UID range starting from 0 to the host range also starting from 0, covering the maximum 32-bit unsigned range:
$ cat /proc/$$/uid_map
         0          0          4294967295
There are several rules around writing these mapping files:
- The writing process must have
CAP_SETUIDorCAP_SETGIDin that namespace. - The process doing the write must belong to either the parent or child user namespace related to the target namespace.
- In addition, one of the following must be true:
1. The parent maps its effective UID/GID into the child user namespace.
2. If the parent has
CAP_SETUID/CAP_SETGID, it may map any UID/GID from the parent namespace.
The rules look tedious, but the mechanics are easier to understand from a working example. The program below is a small demonstration. It is not complicated, even though it is a bit long.
#define _GNU_SOURCE
#include <stdio.h>
#include <stdlib.h>
#include <sys/types.h>
#include <sys/wait.h>
#include <sys/mount.h>
#include <sys/capability.h>
#include <stdio.h>
#include <sched.h>
#include <signal.h>
#include <unistd.h>

#define STACK_SIZE (1024 * 1024)

static char container_stack[STACK_SIZE];
char* const container_args[] = {
    "/bin/bash",
    NULL
};

int pipefd[2];

void set_map(char* file, int inside_id, int outside_id, int len) {
    FILE* mapfd = fopen(file, "w");
    if (NULL == mapfd) {
        perror("open file error");
        return;
    }
    fprintf(mapfd, "%d %d %d", inside_id, outside_id, len);
    fclose(mapfd);
}

void set_uid_map(pid_t pid, int inside_id, int outside_id, int len) {
    char file[256];
    sprintf(file, "/proc/%d/uid_map", pid);
    set_map(file, inside_id, outside_id, len);
}

void set_gid_map(pid_t pid, int inside_id, int outside_id, int len) {
    char file[256];
    sprintf(file, "/proc/%d/gid_map", pid);
    set_map(file, inside_id, outside_id, len);
}

int container_main(void* arg)
{

    printf("Container [%5d] - inside the container!\n", getpid());

    printf("Container: eUID = %ld;  eGID = %ld, UID=%ld, GID=%ld\n",
            (long) geteuid(), (long) getegid(), (long) getuid(), (long) getgid());

    /* 等待父进程通知后再往下执行(进程间的同步) */
    char ch;
    close(pipefd[1]);
    read(pipefd[0], &ch, 1);

    printf("Container [%5d] - setup hostname!\n", getpid());
    //set hostname
    sethostname("container",10);

    //remount "/proc" to make sure the "top" and "ps" show container's information
    mount("proc", "/proc", "proc", 0, NULL);

    execv(container_args[0], container_args);
    printf("Something's wrong!\n");
    return 1;
}

int main()
{
    const int gid=getgid(), uid=getuid();

    printf("Parent: eUID = %ld;  eGID = %ld, UID=%ld, GID=%ld\n",
            (long) geteuid(), (long) getegid(), (long) getuid(), (long) getgid());

    pipe(pipefd);

    printf("Parent [%5d] - start a container!\n", getpid());

    int container_pid = clone(container_main, container_stack+STACK_SIZE,
            CLONE_NEWUTS | CLONE_NEWPID | CLONE_NEWNS | CLONE_NEWUSER | SIGCHLD, NULL);


    printf("Parent [%5d] - Container [%5d]!\n", getpid(), container_pid);

    //To map the uid/gid,
    //   we need edit the /proc/PID/uid_map (or /proc/PID/gid_map) in parent
    //The file format is
    //   ID-inside-ns   ID-outside-ns   length
    //if no mapping,
    //   the uid will be taken from /proc/sys/kernel/overflowuid
    //   the gid will be taken from /proc/sys/kernel/overflowgid
    set_uid_map(container_pid, 0, uid, 1);
    set_gid_map(container_pid, 0, gid, 1);

    printf("Parent [%5d] - user/group mapping done!\n", getpid());

    /* 通知子进程 */
    close(pipefd[1]);

    waitpid(container_pid, NULL, 0);
    printf("Parent - container stopped!\n");
    return 0;
}
The parent and child are synchronized with a pipe. That detail matters because the child later calls execv, and execv replaces the entire process image. The UID/GID mapping must be completed before that happens. If the mapping makes inside-UID 0 correspond to the host user, then the /bin/bash launched by execv will appear inside the namespace as root and show a # prompt.
A typical run looks like this:
hchen@ubuntu:~$ id
uid=1000(hchen) gid=1000(hchen) groups=1000(hchen)

hchen@ubuntu:~$ ./user #<--以hchen用户运行
Parent: eUID = 1000;  eGID = 1000, UID=1000, GID=1000
Parent [ 3262] - start a container!
Parent [ 3262] - Container [ 3263]!
Parent [ 3262] - user/group mapping done!
Container [    1] - inside the container!
Container: eUID = 0;  eGID = 0, UID=0, GID=0 #<---Container里的UID/GID都为0了
Container [    1] - setup hostname!

root@container:~# id #<----我们可以看到容器里的用户和命令行提示符是root用户了
uid=0(root) gid=0(root) groups=0(root),65534(nogroup)
Inside the container, the shell looks like it is running as root. On the host, however, /bin/bash is still really running as the ordinary user hchen. This is exactly why User Namespace is valuable: the process can have root-like identity inside while remaining far less privileged outside.
There is also an important practical question here. User namespaces can be created by an ordinary user, but several other namespaces usually require root privileges. When multiple namespaces are needed together, a common approach is:
- Create a User Namespace as a normal user.
- Map that user to root inside the namespace.
- Use that root identity inside the container to create the other namespaces.
Network Namespace
Network namespaces are more verbose to explain because they involve real wiring. Under Linux, the ip command is the usual tool for creating and managing them. Docker itself does not rely on the shell command in that direct way; it implements the required functionality internally, using lower-level mechanisms such as raw sockets. But the ip command makes the model much easier to see.
The rough topology on a host running Docker usually looks like this:
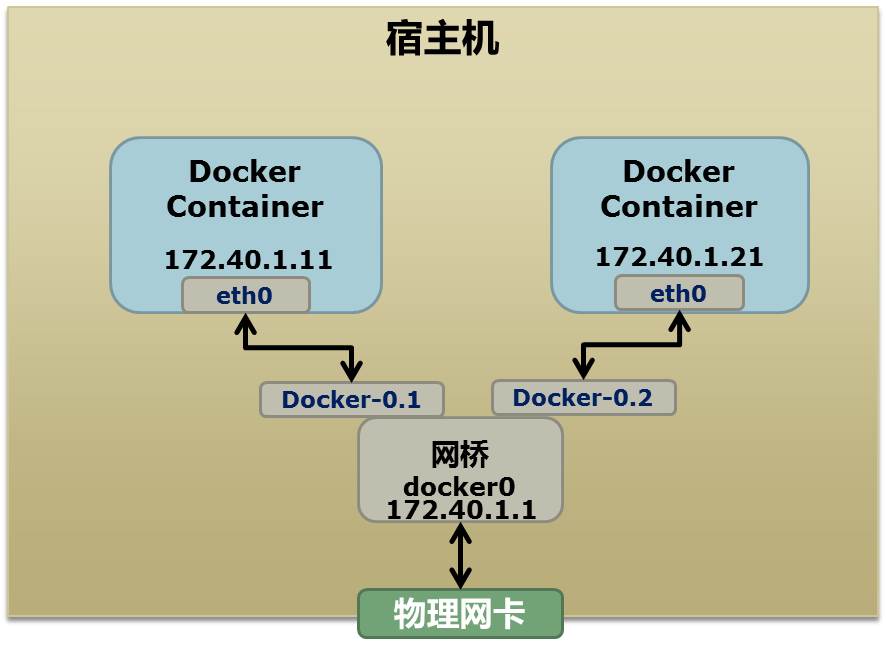
Docker typically allocates a private subnet such as 172.40.1.0, and it may also use private ranges like 10.0.0.0 or 192.168.0.0, depending on what is already present in the routing table. If all suitable private ranges are already in use, Docker may fail to start because it cannot pick a safe subnet.
Once a container is running, ip link show or ip addr show on the host will usually reveal a bridge such as docker0 and one or more virtual Ethernet interfaces for containers, such as veth22a38e6:
hchen@ubuntu:~$ ip link show
1: lo: <LOOPBACK,UP,LOWER_UP> mtu 65536 qdisc noqueue state ...
    link/loopback 00:00:00:00:00:00 brd 00:00:00:00:00:00
2: eth0: <BROADCAST,MULTICAST,UP,LOWER_UP> mtu 1500 qdisc ...
    link/ether 00:0c:29:b7:67:7d brd ff:ff:ff:ff:ff:ff
3: docker0: <BROADCAST,MULTICAST,UP,LOWER_UP> mtu 1500 ...
    link/ether 56:84:7a:fe:97:99 brd ff:ff:ff:ff:ff:ff
5: veth22a38e6: <BROADCAST,UP,LOWER_UP> mtu 1500 qdisc ...
    link/ether 8e:30:2a:ac:8c:d1 brd ff:ff:ff:ff:ff:ff
To build something similar by hand, the commands below create a bridge, add a network namespace, create a veth pair, move one end into the namespace, assign addresses, and configure routing and DNS:
## 首先,我们先增加一个网桥lxcbr0,模仿docker0
brctl addbr lxcbr0
brctl stp lxcbr0 off
ifconfig lxcbr0 192.168.10.1/24 up #为网桥设置IP地址

## 接下来,我们要创建一个network namespace - ns1

# 增加一个namesapce 命令为 ns1 (使用ip netns add命令)
ip netns add ns1

# 激活namespace中的loopback,即127.0.0.1(使用ip netns exec ns1来操作ns1中的命令)
ip netns exec ns1   ip link set dev lo up

## 然后,我们需要增加一对虚拟网卡

# 增加一个pair虚拟网卡,注意其中的veth类型,其中一个网卡要按进容器中
ip link add veth-ns1 type veth peer name lxcbr0.1

# 把 veth-ns1 按到namespace ns1中,这样容器中就会有一个新的网卡了
ip link set veth-ns1 netns ns1

# 把容器里的 veth-ns1改名为 eth0 (容器外会冲突,容器内就不会了)
ip netns exec ns1  ip link set dev veth-ns1 name eth0

# 为容器中的网卡分配一个IP地址,并激活它
ip netns exec ns1 ifconfig eth0 192.168.10.11/24 up


# 上面我们把veth-ns1这个网卡按到了容器中,然后我们要把lxcbr0.1添加上网桥上
brctl addif lxcbr0 lxcbr0.1

# 为容器增加一个路由规则,让容器可以访问外面的网络
ip netns exec ns1     ip route add default via 192.168.10.1

# 在/etc/netns下创建network namespce名称为ns1的目录,
# 然后为这个namespace设置resolv.conf,这样,容器内就可以访问域名了
mkdir -p /etc/netns/ns1
echo "nameserver 8.8.8.8" > /etc/netns/ns1/resolv.conf
This is essentially the same idea Docker uses for container networking. There are two notable differences:
- Docker does not handle
resolv.confthrough/etc/netns/<name>/resolv.conf; instead, it uses a Mount Namespace-based approach. - Docker identifies network namespaces by process PID rather than by a manually assigned name like
ns1.
Once the mechanism is clear, it becomes possible to attach an extra network interface to a running container as well:
ip link add peerA type veth peer name peerB
brctl addif docker0 peerA
ip link set peerA up
ip link set peerB netns ${container-pid}
ip netns exec ${container-pid} ip link set dev peerB name eth1
ip netns exec ${container-pid} ip link set eth1 up ;
ip netns exec ${container-pid} ip addr add ${ROUTEABLE_IP} dev eth1 ;
That sequence creates an eth1 inside an already running container and assigns it a static routable IP address.
To make this work externally, the host’s physical NIC must be placed in promiscuous mode. In that setup, eth1 can advertise its own MAC address through ARP. The external switch will then forward traffic for that IP toward the host NIC, and because the NIC is in promiscuous mode, the packet is visible to the virtual interface that owns it.
That gives the container direct network reachability, but it comes with trade-offs. Docker’s common NAT-based model has forwarding overhead. Promiscuous mode has its own cost as well: traffic received on the host NIC gets exposed across virtual interfaces, so one interface can still be affected by traffic meant for another.
Neither model is ideal. A more complete answer to this kind of networking problem involves VLAN-related techniques. To address that, Google engineers added an IPVLAN driver to the Linux kernel, a mechanism that fits container networking particularly well.
Namespace files under /proc
Namespace usage is not limited to creation flags and networking commands. Linux also exposes namespace information through files under /proc/<pid>/ns, which becomes very useful once multiple isolated environments are running.
Suppose the earlier PID Namespace example is started and left running:
$ sudo ./pid.mnt
[sudo] password for hchen:
Parent [ 4599] - start a container!
Container [    1] - inside the container!
From another shell, the parent and child PIDs can be checked:
hchen@ubuntu:~$ pstree -p 4599
pid.mnt(4599)───bash(4600)
On a kernel version 3.8 or newer, each process’s namespace links can be examined under /proc/<pid>/ns.
For the parent process:
hchen@ubuntu:~$ sudo ls -l /proc/4599/ns
total 0
lrwxrwxrwx 1 root root 0  4月  7 22:01 ipc -> ipc:[4026531839]
lrwxrwxrwx 1 root root 0  4月  7 22:01 mnt -> mnt:[4026531840]
lrwxrwxrwx 1 root root 0  4月  7 22:01 net -> net:[4026531956]
lrwxrwxrwx 1 root root 0  4月  7 22:01 pid -> pid:[4026531836]
lrwxrwxrwx 1 root root 0  4月  7 22:01 user -> user:[4026531837]
lrwxrwxrwx 1 root root 0  4月  7 22:01 uts -> uts:[4026531838]
For the child process:
hchen@ubuntu:~$ sudo ls -l /proc/4600/ns
total 0
lrwxrwxrwx 1 root root 0  4月  7 22:01 ipc -> ipc:[4026531839]
lrwxrwxrwx 1 root root 0  4月  7 22:01 mnt -> mnt:[4026532520]
lrwxrwxrwx 1 root root 0  4月  7 22:01 net -> net:[4026531956]
lrwxrwxrwx 1 root root 0  4月  7 22:01 pid -> pid:[4026532522]
lrwxrwxrwx 1 root root 0  4月  7 22:01 user -> user:[4026531837]
lrwxrwxrwx 1 root root 0  4月  7 22:01 uts -> uts:[4026532521]
The IDs make namespace sharing visible at a glance. Here, ipc, net, and user are the same for both processes, while mnt, pid, and uts differ. If two processes point to the same namespace number, they are in the same namespace of that type. If the numbers differ, they are isolated from each other in that area.
These files are useful for another reason as well: if one of them is kept open, the namespace can remain alive even after all processes originally in that namespace have exited. For example, binding one of these paths can hold the namespace:
mount –bind /proc/4600/ns/uts ~/uts
That also connects directly to the setns system call mentioned earlier. Its declaration is:
int setns(int fd, int nstype);
The first argument is a file descriptor returned by open() on one of those namespace files. For example:
fd = open("/proc/4600/ns/nts", O_RDONLY);  // 获取namespace文件描述符
setns(fd, 0); // 加入新的namespace
With that, a process can join an existing namespace instead of creating a new one.
User Namespace and Network Namespace are where container internals stop looking like abstract kernel features and start resembling a working system. One gives an ordinary host user a root identity inside a confined environment. The other gives that environment its own interfaces, routes, and connectivity model. Add the namespace file handles under /proc, and Linux provides not only isolation, but a way to inspect, preserve, and even re-enter those isolated contexts.