2025 update
A newer Debian 12 image is now available for the Phicomm N1:
Armbian_25.02.0_amlogic_s905d_bookworm_6.6.68_server_2025.01.01.img.gz
Overseas download mirror
Mainland China download line: Armbian_25.02.0_amlogic_s905d_bookworm_6.6.68_server_2025.01.01.img.gz (access password: 3705)
Installation method
Write the image to a USB drive with a tool such as balenaEtcher, then plug that prepared USB drive into the box.
Log in to Armbian (default user: root, default password: 1234), then run:
armbian-install
I recently picked up a Phicomm N1. Mine was a white, unopened unit running V2.19_0307_NS, which conveniently meant there was no need to downgrade first. Below is the full process used to install Armbian on it.
Enable ADB debugging mode
Connect the N1 to a monitor over HDMI, plug a mouse into one of the USB ports, and power it on. On the screen, repeatedly click the area showing System version: V2.19_0307_NS. After several clicks, a prompt will appear indicating that ADB debugging mode has been enabled.
You will also need Minimal ADB and Fastboot v1.4.3. Download it and install it. Access password: 3705.
Prepare the bootable USB drive
Use a USB drive with at least 8 GB capacity. Install balenaEtcher as the image writing tool.
For the system image, one example is:
Armbian_5.98_Aml-g12_Debian_buster_dev_5.4.0-rc4_20191025.img.xz
This is a Debian image without a desktop environment. If you need a different build, you can choose another suitable Armbian image.
Access password for that image: 3705.
A newer Ubuntu 22.04 server build is also available for anyone who prefers it:
Armbian_23.05.0_amlogic_s905d_jammy_6.1.29_server_2023.05.18.img.gz
Access password: 3705.
After downloading the image, write it to the USB drive with balenaEtcher. Once the writing process finishes, do not remove the drive yet. Open the BOOT partition, find the uEnv.ini file, and change the dtb_name line to the following:
dtb_name=/dtb/amlogic/meson-gxl-s905d-phicomm-n1.dtb
Then safely close the drive and keep it ready.
If the file meson-gxl-s905d-phicomm-n1.dtb is missing from /dtd/amlogic/ under the BOOT partition, download that file separately and place it in the matching directory.
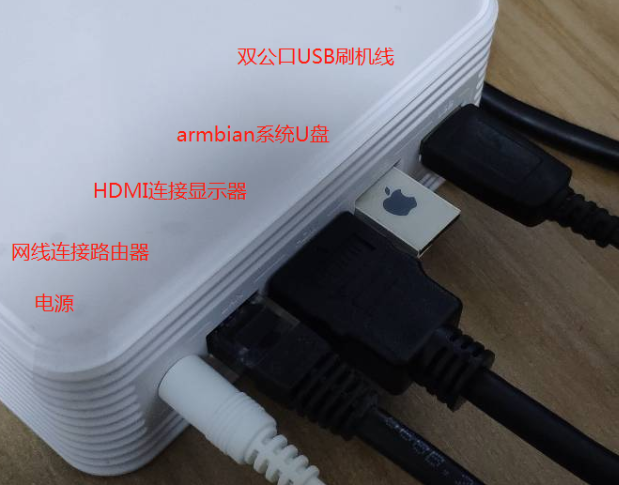
Boot Armbian from USB
Insert the prepared system USB drive into the USB port closest to the HDMI port. Use the other USB port for the double-ended USB flashing cable connected to your computer. Also connect the N1 to a monitor over HDMI and plug in the Ethernet cable before powering it on.
With the device powered on, the monitor will show the IP address assigned to the box. On the computer, launch Minimal ADB and Fastboot and connect with:
adb connect 192.168.1.54
If the connection succeeds, you should see:
connected to 192.168.1.54:5555
Then run:
adb shell reboot update
This tells the box to reboot and start Armbian from the USB drive. Once Armbian has booted successfully, the USB flashing cable is no longer needed. You can unplug it and connect an external keyboard for the remaining steps.
The default Armbian login is root with password 1234. Log in with those credentials, and the system will prompt you to change the default password.
After that, it may ask you to create a regular user account:
Creating a new user account. Press <Ctrl-C> to abort

Please provide a username (eg. your forename):
You can create a new user at this point, or press Ctrl+C and continue using the root account.
Install Armbian to the N1 internal storage
At this stage, Armbian is only running from the USB drive. To make the setup permanent, install it to the N1's built-in eMMC storage so the box can boot without the USB drive.
If you are logged in as root, run install.sh from the root home directory:
 root@aml:~# ./install. sh
 Start script create MBR and filesystem
 /dev/mmcblk1
 Start backup u-boot default
 4+0 records in
 4+0 records out
4194304 bytes(4.2mb,4.omib) copied,o.793832s,52.8mb/s Start create MBR and partittion
 start restore u-boot
 442+0 records in
 442+0 records out
 442 bytes copied, 0.0123705 s, 35.7 KB/
 8191+0 records in
 8191+0 records out
 4193792 bytes (4.2 MB, 4.0 MiB) copied, 0.414592, 10.1 MB/s Done
 Start copy system for eMMC.
 Formatting BOOT partition... mkfs. fat 4.1 (2017-01-24)
 done.
 Cppying BOOT... done.
 Edit init config... done.
 Formatt ing ROOT partition...
 e2fsck1.44.5(15-dec-2018)
 ROOT EMMC: clean, 11/427392 files, 50723/1706240 blocks
 done.
 Copying ROOTFS.
 Copy BIN
 Create DEV
 Copy ETC
 Copy HOME
 Copy LIB
 Create MEDIA
 Create MNT
 Copy OPT
 Create PROC
 Copy ROOT
 Create RUN
 Copy SBIN
 Copy SEL INUX
 Copy SRV
 Create SYS
 Create TMP
 Copy USR
 Copy VAR
 Copy fstab
*****************************
 Complete copy os to eMMC
*****************************
When Complete copy OS to eMMC appears, the installation has finished. Run halt to shut the box down, remove the USB drive, and power it back on.
If you are not logged in as root, use the following commands instead:
$su
#cd /root/
#./install.sh
Once that is done, the N1 should boot directly from internal storage into Armbian.