Dynamic routing is one of the foundations of inter-network communication. Whether you are working with a small office topology or a larger campus-style network, RIP, OSPF, and EIGRP are three protocols you will encounter again and again. Using a single Cisco Packet Tracer topology, this lab walks through how each one is configured, how they differ in operation, and where each protocol fits best. It is especially useful for beginners and for anyone preparing for CCNA-level routing labs.
Why dynamic routing matters
Compared with static routes, dynamic routing protocols can automatically learn, exchange, and maintain routing information. That makes them far more adaptable when the network changes.
Each of the three protocols has a different role:
- RIP is a distance-vector protocol. It is the easiest to configure, but it has a hard limit of 15 hops, so it is best suited to small networks.
- OSPF is a link-state protocol. It converges quickly, scales well, and is commonly used in enterprise environments.
- EIGRP is a Cisco protocol that combines characteristics associated with distance-vector and link-state behavior. It is a strong fit for small and medium Cisco-based networks.
The goal of this lab is straightforward: use the same topology to configure all three protocols, verify connectivity, and understand the differences in configuration style, convergence behavior, and recommended use cases.
Lab environment and addressing plan
Devices used
All three protocol exercises share the same lab setup:
<table> <thead> <tr> <th>Device Type</th> <th>Model</th> <th>Quantity</th> <th>Purpose</th> </tr> </thead> <tbody> <tr> <td>Core Router</td> <td>Cisco 4331</td> <td>2</td> <td>Connect the backbone and LAN segments</td> </tr> <tr> <td>Access Switch</td> <td>Cisco 2960</td> <td>2</td> <td>Provide endpoint access</td> </tr> <tr> <td>End Host</td> <td>PC-PT</td> <td>2</td> <td>Simulate client devices</td> </tr> <tr> <td>Cabling</td> <td>Crossover / Straight-through</td> <td>Several</td> <td>Crossover between routers, straight-through from devices to switches</td> </tr> </tbody> </table>Topology

IP addressing plan
<table> <thead> <tr> <th>Network Segment</th> <th>IP Network</th> <th>Subnet Mask</th> <th>Gateway</th> <th>Connected Interface</th> </tr> </thead> <tbody> <tr> <td>Right-side LAN</td> <td>192.168.1.0</td> <td>255.255.255.0</td> <td>192.168.1.254</td> <td>R1-G0/0/1</td> </tr> <tr> <td>Backbone Transit Network</td> <td>10.0.0.0</td> <td>255.255.255.0</td> <td>–</td> <td>R1-G0/0/0 to R2-G0/0/1</td> </tr> <tr> <td>Left-side LAN</td> <td>172.16.1.0</td> <td>255.255.255.0</td> <td>172.16.1.254</td> <td>R2-G0/0/0</td> </tr> </tbody> </table>Shared base configuration
Before enabling any routing protocol, both routers and both PCs need working interface and IP settings.
Router interface setup
R1
# 进入全局配置模式

Router> enable

Router# configure terminal

# 配置骨干网接口(连接R2)

Router(config)# interface GigabitEthernet 0/0/0

Router(config-if)# ip address 10.0.0.1 255.255.255.0  # R1骨干网IP

Router(config-if)# no shutdown  # 激活接口

# 配置右侧局域网接口(连接PC1)

Router(config)# interface GigabitEthernet 0/0/1

Router(config-if)# ip address 192.168.1.254 255.255.255.0  # 右侧网关

Router(config-if)# no shutdown
R2
# 骨干网接口(连接R1)

Router(config)# interface GigabitEthernet 0/0/1

Router(config-if)# ip address 10.0.0.2 255.255.255.0  # R2骨干网IP

Router(config-if)# no shutdown

# 左侧局域网接口(连接PC2)

Router(config)# interface GigabitEthernet 0/0/0

Router(config-if)# ip address 172.16.1.254 255.255.255.0  # 左侧网关

Router(config-if)# no shutdown
PC settings
- PC1: IP = 192.168.1.1, Subnet Mask = 255.255.255.0, Gateway = 192.168.1.254
- PC2: IP = 172.16.1.1, Subnet Mask = 255.255.255.0, Gateway = 172.16.1.254
Once the interfaces are up and the PCs have the correct gateway addresses, the topology is ready for dynamic routing.
RIP configuration
RIP uses hop count as its metric. It is simple, lightweight, and easy to understand, but limited in scale. Version 2 is preferred because it supports subnet masks.
R1 RIP setup
# 启动RIP进程,指定版本2

Router(config)# router rip

Router(config-router)# version 2  # 必选,v2支持CIDR

Router(config-router)# network 192.168.1.0 0.0.0.255  # 宣告右侧局域网(反掩码)

Router(config-router)# network 10.0.0.0 0.0.0.255  # 宣告骨干网

Router(config-router)# no auto-summary  # 关闭自动汇总(避免路由黑洞)
R2 RIP setup
Router(config)# router rip

Router(config-router)# version 2

Router(config-router)# network 172.16.1.0 0.0.0.255  # 宣告左侧局域网

Router(config-router)# network 10.0.0.0 0.0.0.255  # 宣告骨干网

Router(config-router)# no auto-summary
The key points with RIP in this lab are using version 2 and disabling automatic summarization. Without that, route advertisement behavior can become problematic in some addressing designs.
OSPF configuration
OSPF calculates routes from a link-state database and is designed for larger, more complex networks. It requires area-based design, and area 0 is mandatory as the backbone area.
R1 OSPF setup
# 启动OSPF进程(进程号1仅本地有效)

Router(config)# router ospf 1# 宣告网段到骨干区域0(反掩码+区域号)

Router(config-router)# network 192.168.1.0 0.0.0.255 area 0

Router(config-router)# network 10.0.0.0 0.0.0.255 area 0
R2 OSPF setup
Router(config)# router ospf 1

Router(config-router)# network 172.16.1.0 0.0.0.255 area 0

Router(config-router)# network 10.0.0.0 0.0.0.255 area 0
In this topology, everything is placed into area 0, which keeps the configuration simple while still showing the essential OSPF workflow.
EIGRP configuration
EIGRP is a Cisco routing protocol known for fast convergence and efficient route updates. In a basic deployment like this one, the most important requirement is that all participating routers use the same autonomous system number.
R1 EIGRP setup
# 启动EIGRP进程,AS号1(全网需一致)

Router(config)# router eigrp 1

Router(config-router)# no auto-summary  # 关闭自动汇总# 宣告直连网段(用子网掩码,非反掩码)

Router(config-router)# network 192.168.1.0 255.255.255.0

Router(config-router)# network 10.0.0.0 255.255.255.0
R2 EIGRP setup
Router(config)# router eigrp 1

Router(config-router)# no auto-summary

Router(config-router)# network 172.16.1.0 255.255.255.0

Router(config-router)# network 10.0.0.0 255.255.255.0
Compared with RIP and OSPF, the EIGRP syntax here stands out because the network command uses a subnet mask rather than a wildcard mask in this example.
How the three protocols differ
Although all three can successfully exchange routes in this topology, they behave very differently under the hood.
<table> <thead> <tr> <th>Comparison</th> <th>RIP</th> <th>OSPF</th> <th>EIGRP</th> </tr> </thead> <tbody> <tr> <td>Protocol type</td> <td>Distance vector</td> <td>Link state</td> <td>Hybrid</td> </tr> <tr> <td>Route calculation</td> <td>Hop count, maximum 15 hops</td> <td>Dijkstra shortest-path algorithm</td> <td>DUAL algorithm</td> </tr> <tr> <td>Update behavior</td> <td>Broadcasts routing table every 30 seconds</td> <td>Triggered updates when the topology changes</td> <td>Partial updates, only changed routes</td> </tr> <tr> <td>Subnet support</td> <td>RIPv2 supports CIDR, typically with auto-summary disabled</td> <td>Native support for VLSM/CIDR</td> <td>Supports CIDR, commonly with auto-summary disabled</td> </tr> <tr> <td>Main configuration focus</td> <td>Same version andno auto-summary</td>
<td>Area 0 and wildcard-based network statements</td>
<td>Same AS number and subnet-mask-based network statements</td>
</tr>
<tr>
<td>Typical network size</td>
<td>Small, under 50 devices</td>
<td>Large-scale enterprise networks, potentially tens of thousands of devices</td>
<td>Small to medium Cisco networks</td>
</tr>
<tr>
<td>Convergence speed</td>
<td>Slow, often measured in minutes</td>
<td>Fast, usually in seconds</td>
<td>Very fast, often in milliseconds</td>
</tr>
</tbody>
</table>
This is why the same lab feels different depending on the protocol. RIP emphasizes simplicity, OSPF emphasizes structure and scalability, and EIGRP emphasizes efficient operation inside Cisco environments.
Connectivity test
Test method
On PC1, open the command prompt and run:
ping 172.16.1.1
This checks whether PC1 can reach PC2 across different subnets through the routers.
Result
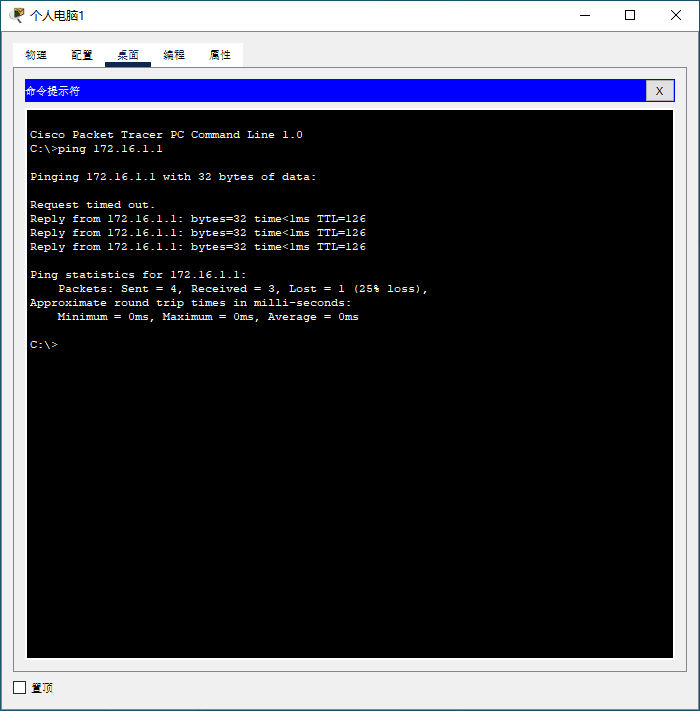
All three protocols ultimately provide successful inter-subnet communication. The observed TTL value is 126, which matches an initial TTL of 128 reduced by two routed hops.
Because the overall configuration flow is quite similar across the three protocols, a single successful test result is enough to confirm that the topology works as expected once routing is learned correctly.
Troubleshooting workflow
When the ping test fails, it helps to troubleshoot from the bottom up rather than jumping straight into protocol details.
General checks
-
Interface status: make sure the router interfaces are enabled.
Command:show ip interface brief
The relevant interfaces should show asup. -
Direct IP connectivity: verify that the backbone link works before expecting learned routes.
Command:ping 10.0.0.2
From R1, this confirms whether the direct connection to R2 is functioning. -
Protocol configuration: confirm that no required networks were missed.
Command:show running-config
Protocol-specific verification commands
<table> <thead> <tr> <th>Protocol</th> <th>Route Table Check</th> <th>Neighbor Verification</th> </tr> </thead> <tbody> <tr> <td>RIP</td> <td>show ip route rip</td>
<td>None, because RIP does not maintain a neighbor table</td>
</tr>
<tr>
<td>OSPF</td>
<td>show ip route ospf</td>
<td>show ip ospf neighbor</td>
</tr>
<tr>
<td>EIGRP</td>
<td>show ip route eigrp</td>
<td>show ip eigrp neighbors</td>
</tr>
</tbody>
</table>
These commands make it much easier to isolate whether the issue is with interface state, IP reachability, missing route advertisements, or adjacency formation.
Choosing the right protocol
In practice, protocol selection depends on network size, design goals, and vendor environment.
- Small office or lab network: RIP is the easiest choice. It is simple to deploy and uses few resources.
- Large enterprise or multi-vendor network: OSPF is usually the better fit because it is an open standard and handles complex topologies well.
- Small to medium Cisco-based network: EIGRP is attractive when fast convergence and Cisco ecosystem compatibility matter.
Good next steps for further practice
Once this basic topology is working, there are several useful directions to continue with:
- Route redistribution: run RIP and OSPF in the same environment and import routes between them.
- Multi-area OSPF: split the design into area 0 and area 1, then configure an ABR.
- EIGRP authentication: add key-based authentication to improve routing security.
The real value of this lab is not just getting a successful ping. It is seeing how protocol characteristics shape deployment choices. Repeating the exercise in Packet Tracer and watching the route table change after each configuration step is one of the fastest ways to build intuition for dynamic routing.