1. A basic demo
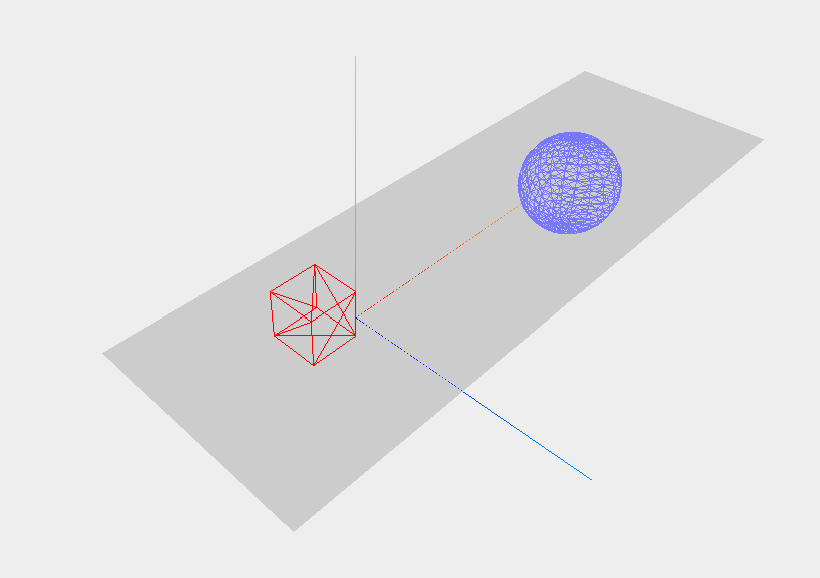
The scene above is a simple but useful starting point: a gray plane, coordinate axes, a wireframe cube, and a wireframe sphere, all viewed through a perspective camera. The full example is shown below.
<!DOCTYPE html>

<html>

<head>
    <title>Example 01.02 - First Scene</title>
    <script type="text/javascript" src="http://cdn.staticfile.org/three.js/r69/three.min.js"></script>
    <style>
        body {
            /* set margin to 0 and overflow to hidden, to go fullscreen */
            margin: 0;
            overflow: hidden;
        }
    </style>
</head>
<body>

<!-- 用来保存输出结果 -->
<div id="WebGL-output">
</div>

<script type="text/javascript">

    // 当页面加载完成时运行初始化函数, 完成绘制
    function init() {

        // 首先创建一个场景,各种元素都将添加到场景
        var scene = new THREE.Scene();

        // 创建一个我们的视角
        var camera = new THREE.PerspectiveCamera(45, window.innerWidth / window.innerHeight, 0.1, 1000);

        // 创建一个渲染器
        var renderer = new THREE.WebGLRenderer();
        renderer.setClearColorHex();
        renderer.setClearColor(new THREE.Color(0xEEEEEE));
        renderer.setSize(window.innerWidth, window.innerHeight);

        // 添加坐标轴到场景
        var axes = new THREE.AxisHelper(20);
        scene.add(axes);

        // 创建一个平面层
        var planeGeometry = new THREE.PlaneGeometry(60, 20);
        var planeMaterial = new THREE.MeshBasicMaterial({color: 0xcccccc});
        var plane = new THREE.Mesh(planeGeometry, planeMaterial);

        // 旋转并设置平面层位置
        plane.rotation.x = -0.5 * Math.PI;
        plane.position.x = 15;
        plane.position.y = 0;
        plane.position.z = 0;

        // 将平面层加入到场景
        scene.add(plane);

        // 创建一个正方体
        var cubeGeometry = new THREE.BoxGeometry(4, 4, 4);
        var cubeMaterial = new THREE.MeshBasicMaterial({color: 0xff0000, wireframe: true});
        var cube = new THREE.Mesh(cubeGeometry, cubeMaterial);

        // 设置这个正方体的位置
        cube.position.x = -4;
        cube.position.y = 3;
        cube.position.z = 0;

        // 添加方体到场景中
        scene.add(cube);

        // 创建一个球体
        var sphereGeometry = new THREE.SphereGeometry(4, 20, 20);
        var sphereMaterial = new THREE.MeshBasicMaterial({color: 0x7777ff, wireframe: true});
        var sphere = new THREE.Mesh(sphereGeometry, sphereMaterial);

        // 设置球体的位置
        sphere.position.x = 20;
        sphere.position.y = 4;
        sphere.position.z = 4;

        // 添加球体到场景中
        scene.add(sphere);

        // 设置视角的位置
        camera.position.x = -30;
        camera.position.y = 40;
        camera.position.z = 30;
        camera.lookAt(scene.position);

        // 添加图形到div层
        document.getElementById("WebGL-output").appendChild(renderer.domElement);

        // 渲染场景
        renderer.render(scene, camera);
    }
    window.onload = init;

</script>
</body>
</html>
The structure is very straightforward. Once the comments are read through, the basic flow is clear: create a scene, add a camera and renderer, place a plane, cube, and sphere into the scene, point the camera at the scene, and finally render it into the page.
2. Adding shadows
Adding shadows in Three.js does not require much code. For this example, there are three main changes:
- use a material that reacts to light;
- tell the renderer and objects to handle shadows;
- add a spotlight.
Change the material
In the first demo, MeshBasicMaterial is used together with wireframe to display the cube and sphere. This material is not affected by lighting, so it is not suitable for shaded objects.
Switching to MeshLambertMaterial or MeshPhongMaterial gives the object a material that can respond to light.
Enable shadow receiving and casting
First, enable shadow maps on the renderer:
renderer.setClearColor(new THREE.Color(0xEEEEEE));
renderer.setSize(window.innerWidth, window.innerHeight);
renderer.shadowMapEnabled = true;
Then let the plane receive shadows:
var planeGeometry = new THREE.PlaneGeometry(60, 20);
var planeMaterial = new THREE.MeshLambertMaterial({color: 0xffffff});
var plane = new THREE.Mesh(planeGeometry, planeMaterial);
plane.receiveShadow = true;
For objects that should cast shadows, set castShadow when creating them:
var cubeGeometry = new THREE.BoxGeometry(4, 4, 4);
var cubeMaterial = new THREE.MeshLambertMaterial({color: 0xff0000});
var cube = new THREE.Mesh(cubeGeometry, cubeMaterial);
cube.castShadow = true;
Add a spotlight
Even after changing the materials and enabling shadows, there will still be no shadow without a light source. A spotlight can be added like this:
var spotLight = new THREE.SpotLight(0xffffff);
spotLight.position.set(-40, 60, -10);
spotLight.castShadow = true;
scene.add(spotLight);
Once the light is in the scene, the shadows appear.
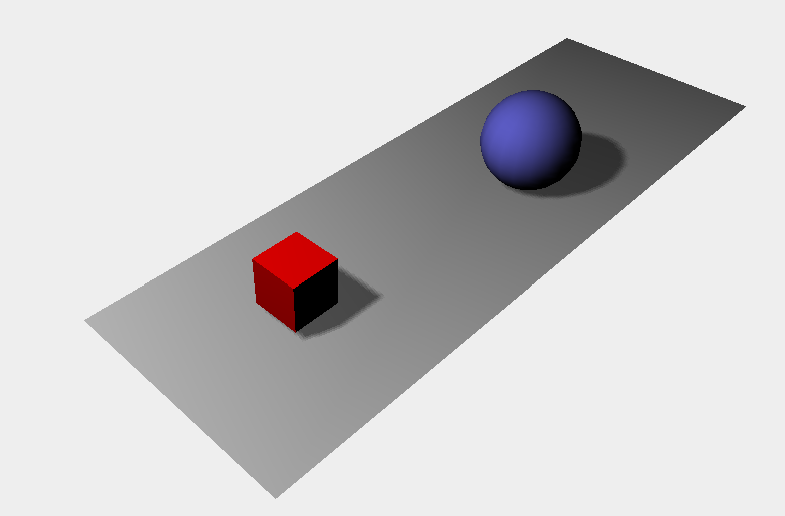
The complete version is:
<!DOCTYPE html>

<html>

<head>
    <title>learning three.js</title>
    <script type="text/javascript" src="http://cdn.staticfile.org/three.js/r69/three.min.js"></script>
    <style>
        body {
            /* set margin to 0 and overflow to hidden, to go fullscreen */
            margin: 0;
            overflow: hidden;
        }
    </style>
</head>
<body>

<!-- 用来保存输出结果 -->
<div id="WebGL-output">
</div>

<script type="text/javascript">

    // 当页面加载完成时运行初始化函数, 完成绘制
    function init() {

        // 首先创建一个场景,各种元素都将添加到场景
        var scene = new THREE.Scene();

        // 创建一个我们的视角
        var camera = new THREE.PerspectiveCamera(45, window.innerWidth / window.innerHeight, 0.1, 1000);

        // 创建一个渲染器
        var renderer = new THREE.WebGLRenderer();
        renderer.setClearColorHex();
        renderer.setClearColor(new THREE.Color(0xEEEEEE));
        renderer.setSize(window.innerWidth, window.innerHeight);
        renderer.shadowMapEnabled = true;

        // 添加坐标轴到场景
        var axes = new THREE.AxisHelper(20);
        scene.add(axes);

        // 创建一个平面层
        var planeGeometry = new THREE.PlaneGeometry(60, 20);
        var planeMaterial = new THREE.MeshBasicMaterial({color: 0xcccccc});
        var plane = new THREE.Mesh(planeGeometry, planeMaterial);
        plane.receiveShadow = true;

        // 旋转并设置平面层位置
        plane.rotation.x = -0.5 * Math.PI;
        plane.position.x = 15;
        plane.position.y = 0;
        plane.position.z = 0;

        // 将平面层加入到场景
        scene.add(plane);

        // 创建一个正方体
        var cubeGeometry = new THREE.BoxGeometry(4, 4, 4);
        var cubeMaterial = new THREE.MeshLambertMaterial({color: 0xff0000});
        var cube = new THREE.Mesh(cubeGeometry, cubeMaterial);
        cube.castShadow = true;

        // 设置这个正方体的位置
        cube.position.x = -4;
        cube.position.y = 3;
        cube.position.z = 0;

        // 添加方体到场景中
        scene.add(cube);

        // 创建一个球体
        var sphereGeometry = new THREE.SphereGeometry(4, 20, 20);
        var sphereMaterial = new THREE.MeshLambertMaterial({color: 0x7777ff});
        var sphere = new THREE.Mesh(sphereGeometry, sphereMaterial);
        sphere.castShadow = true;

        // 设置球体的位置
        sphere.position.x = 20;
        sphere.position.y = 4;
        sphere.position.z = 4;

        // 添加球体到场景中
        scene.add(sphere);

        // 设置视角的位置
        camera.position.x = -30;
        camera.position.y = 40;
        camera.position.z = 30;
        camera.lookAt(scene.position);

        // 添加聚光灯
        var spotLight = new THREE.SpotLight(0xffffff);
        spotLight.position.set(-40, 60, -10);
        spotLight.castShadow = true;
        scene.add(spotLight);

        // 添加图形到div层
        document.getElementById("WebGL-output").appendChild(renderer.domElement);

        // 渲染场景
        renderer.render(scene, camera);
    }
    window.onload = init;

</script>
</body>
</html>
3. Making the scene move
Before HTML5 and the newer JavaScript APIs, animation was often implemented by polling with interval. That approach could push CPU usage quite high and usually did not perform very well.
Now requestAnimationFrame() is the better choice. It lets the browser schedule the update function more appropriately. Compared with the shadow example, this version mainly changes two things:
- adds a performance indicator;
- updates object positions and rotations continuously.
Add the stats display
First include stats.js:
<script type="text/javascript" src="http://cdn.staticfile.org/stats.js/r11/Stats.min.js"></script>
Add a container in the body for the stats panel:
<div id="Stats-output">
</div>
Then define initStats():
function initStats() {

  var stats = new Stats();

  stats.setMode(0); // 0: fps, 1: ms

  // Align top-left
  stats.domElement.style.position = 'absolute';
  stats.domElement.style.left = '0px';
  stats.domElement.style.top = '0px';

  document.getElementById("Stats-output").appendChild(stats.domElement);

  return stats;
}
Inside the initialization logic, call initStats():
$(function () {
    var stats = initStats();
     ...
})
Animate the objects
Previously the scene was rendered directly with:
renderer.render(scene, camera);
Now rendering is wrapped inside renderScene(). Each frame updates the cube rotation and the sphere position:
function renderScene() {
     stats.update();
     // rotate the cube around its axes
     cube.rotation.x += 0.02;
     cube.rotation.y += 0.02;
     cube.rotation.z += 0.02;

     // bounce the sphere up and down
     step += 0.04;
     sphere.position.x = 20 + ( 10 * (Math.cos(step)));
     sphere.position.y = 2 + ( 10 * Math.abs(Math.sin(step)));

     // render using requestAnimationFrame
     requestAnimationFrame(renderScene);
     renderer.render(scene, camera);
}
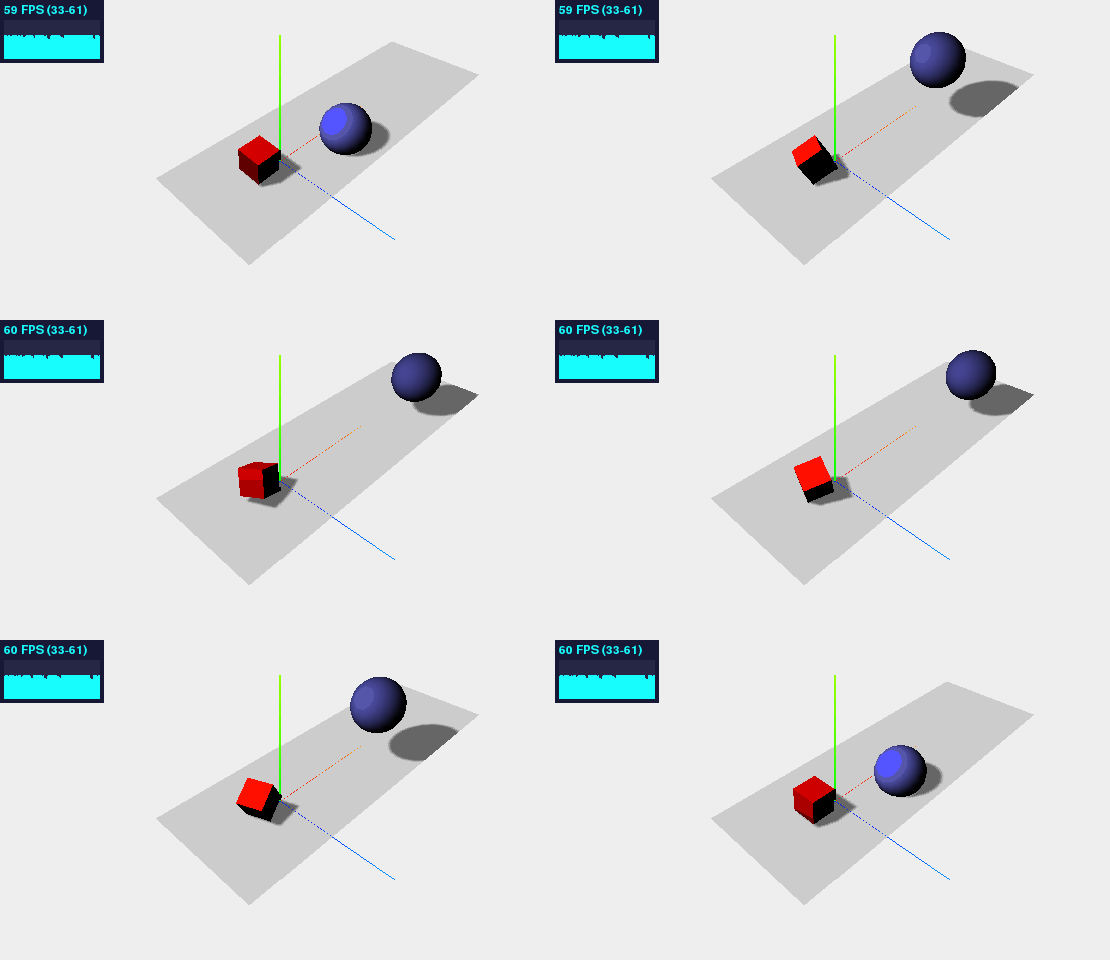
The function calls requestAnimationFrame() every time it runs, and stats.update() is placed at the beginning so the indicator refreshes along with the animation.
Full code:
<!DOCTYPE html>

<html>

<head>
    <title>learning three.js</title>
    <meta charset="utf-8">
    <!-- <script type="text/javascript" src="../libs/three.js"></script> -->
    <script type="text/javascript" src="http://cdn.staticfile.org/three.js/r69/three.min.js"></script>
    <script type="text/javascript" src="http://cdn.staticfile.org/stats.js/r11/Stats.min.js"></script>
    <style>
        body {
            /* set margin to 0 and overflow to hidden, to go fullscreen */
            margin: 0;
            overflow: hidden;
        }
    </style>
</head>
<body>

<!-- 用来保存输出结果 -->
<div id="Stats-output">
</div>

<div id="WebGL-output">
</div>

<script type="text/javascript">

    // 当页面加载完成时运行初始化函数, 完成绘制
    function init() {

        var stats = initStats();

        // 首先创建一个场景,各种元素都将添加到场景
        var scene = new THREE.Scene();

        // 创建一个我们的视角
        var camera = new THREE.PerspectiveCamera(45, window.innerWidth / window.innerHeight, 0.1, 1000);

        // 创建一个渲染器
        var renderer = new THREE.WebGLRenderer();
        renderer.setClearColorHex();
        renderer.setClearColor(new THREE.Color(0xEEEEEE));
        renderer.setSize(window.innerWidth, window.innerHeight);
        renderer.shadowMapEnabled = true;

        // 添加坐标轴到场景
        var axes = new THREE.AxisHelper(20);
        scene.add(axes);

        // 创建一个平面层
        var planeGeometry = new THREE.PlaneGeometry(60, 20);
        var planeMaterial = new THREE.MeshBasicMaterial({color: 0xcccccc});
        var plane = new THREE.Mesh(planeGeometry, planeMaterial);
        plane.receiveShadow = true;

        // 旋转并设置平面层位置
        plane.rotation.x = -0.5 * Math.PI;
        plane.position.x = 15;
        plane.position.y = 0;
        plane.position.z = 0;

        // 将平面层加入到场景
        scene.add(plane);

        // 创建一个正方体
        var cubeGeometry = new THREE.BoxGeometry(4, 4, 4);
        var cubeMaterial = new THREE.MeshLambertMaterial({color: 0xff0000});
        var cube = new THREE.Mesh(cubeGeometry, cubeMaterial);
        cube.castShadow = true;

        // 设置这个正方体的位置
        cube.position.x = -4;
        cube.position.y = 3;
        cube.position.z = 0;

        // 添加方体到场景中
        scene.add(cube);

        // 创建一个球体
        var sphereGeometry = new THREE.SphereGeometry(4, 20, 20);
        var sphereMaterial = new THREE.MeshLambertMaterial({color: 0x7777ff});
        var sphere = new THREE.Mesh(sphereGeometry, sphereMaterial);
        sphere.castShadow = true;

        // 设置球体的位置
        sphere.position.x = 20;
        sphere.position.y = 4;
        sphere.position.z = 4;

        // 添加球体到场景中
        scene.add(sphere);

        // 设置视角的位置
        camera.position.x = -30;
        camera.position.y = 40;
        camera.position.z = 30;
        camera.lookAt(scene.position);

        // 添加聚光灯
        var spotLight = new THREE.SpotLight(0xffffff);
        spotLight.position.set(-40, 60, -10);
        spotLight.castShadow = true;
        scene.add(spotLight);

        // 添加图形到div层
        document.getElementById("WebGL-output").appendChild(renderer.domElement);

        // 渲染场景
        var step = 0;
        renderScene();

        function renderScene() {

          stats.update();

          // 对正方体进行坐标变换
          cube.rotation.x += 0.02;
          cube.rotation.y += 0.02;
          cube.rotation.z += 0.02;

          // 对球进行坐标变换
          step += 0.04;
          sphere.position.x = 20 + (10 * (Math.cos(step)));
          sphere.position.y = 2 + (10 * Math.abs(Math.sin(step)));

          // 使用requestAnimationFrame进行更新
          requestAnimationFrame(renderScene);
          renderer.render(scene, camera);
        }

        // 初始化状态器
        function initStats() {

          var stats = new Stats();

          stats.setMode(0); // 0: fps, 1: ms

          stats.domElement.style.position = 'absolute';
          stats.domElement.style.left = '0px';
          stats.domElement.style.top = '0px';

          document.getElementById('Stats-output').appendChild(stats.domElement);

          return stats;
        }
    }
    window.onload = init;

</script>
</body>
</html>
The animated result looks like this:
4. Controlling the speed
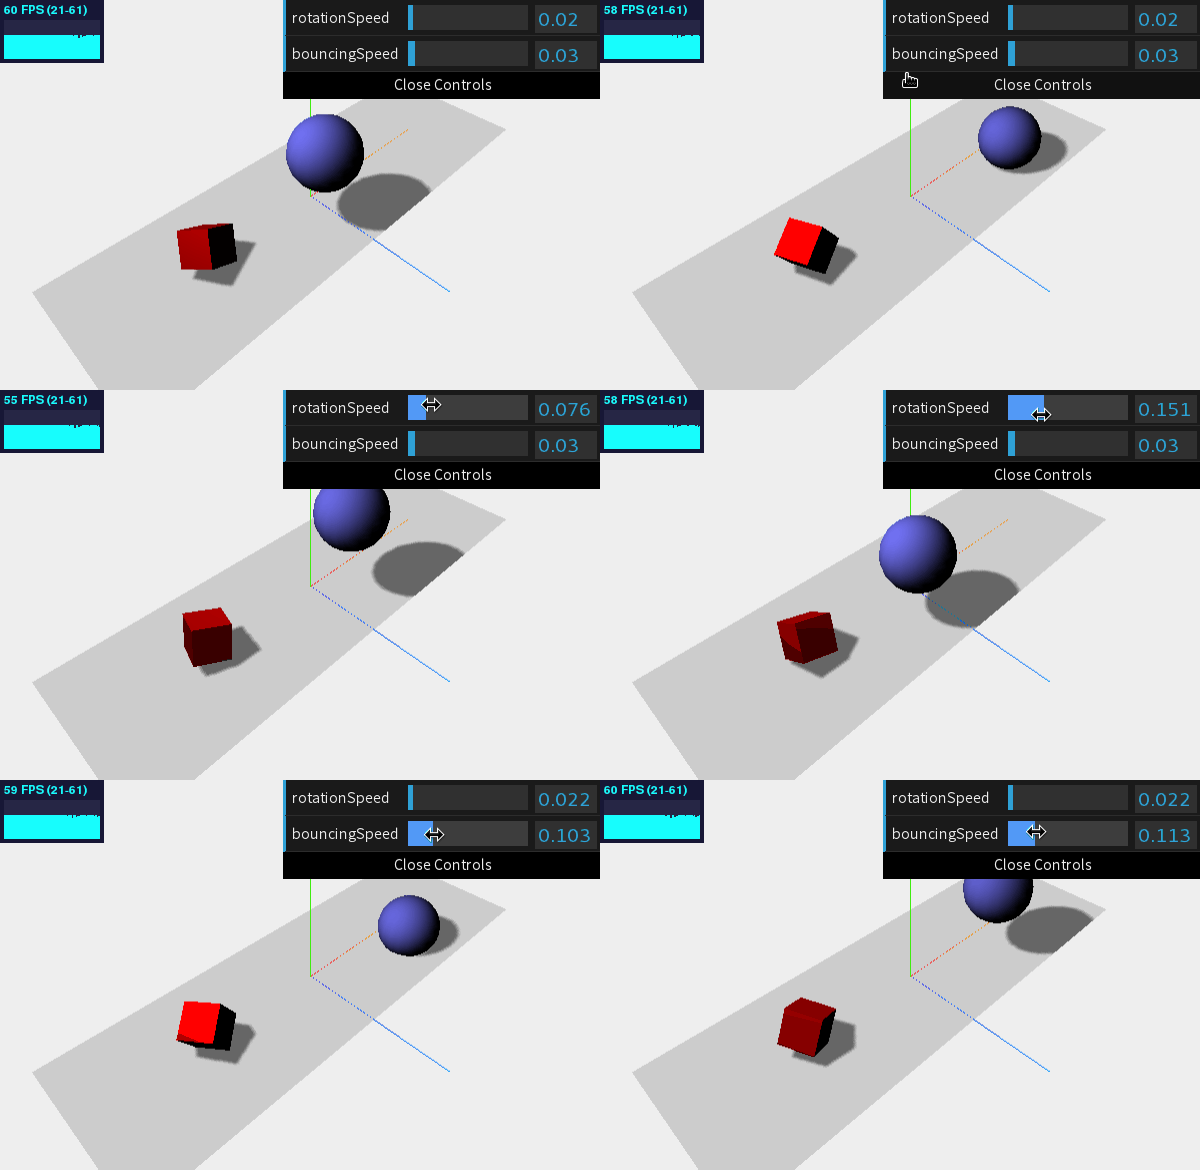
There is a small library called dat.GUI that makes it easy to expose variables as adjustable controls. Here it is used to change the sphere’s bouncing speed and the cube’s rotation speed from the page.
Include the library first:
<script type="text/javascript" src="http://cdn.staticfile.org/dat-gui/0.5/dat.gui.min.js"></script>
Create an object to store the speed values and give both properties initial values:
var controls = new function() {
    this.rotationSpeed = 0.02;
    this.bouncingSpeed = 0.03;
}
Then pass this object to dat.GUI:
var gui = new dat.GUI();
gui.add(controls, 'rotationSpeed', 0, 0.5);
gui.add(controls, 'bouncingSpeed', 0, 0.5);
Both controls are limited to the range [0, 0.5].
Finally, replace the fixed speed values in the animation code with the values from controls:
cube.rotation.x += controls.rotationSpeed;
cube.rotation.y += controls.rotationSpeed;
cube.rotation.z += controls.rotationSpeed;

step += controls.bouncingSpeed;
sphere.position.x = 20 + ( 10 * (Math.cos(step)));
sphere.position.y = 2 + ( 10 * Math.abs(Math.sin(step)));
The result is still simple, but now it is interactive.
<!DOCTYPE html>

<html>

<head>
    <title>learning three.js</title>
    <meta charset="utf-8">
    <!-- <script type="text/javascript" src="../libs/three.js"></script> -->
    <script type="text/javascript" src="http://cdn.staticfile.org/three.js/r69/three.min.js"></script>
    <script type="text/javascript" src="http://cdn.staticfile.org/stats.js/r11/Stats.min.js"></script>
    <script type="text/javascript" src="http://cdn.staticfile.org/dat-gui/0.5/dat.gui.min.js"></script>
    <style>
        body {
            /* set margin to 0 and overflow to hidden, to go fullscreen */
            margin: 0;
            overflow: hidden;
        }
    </style>
</head>
<body>

<!-- 用来保存输出结果 -->
<div id="Stats-output">
</div>

<div id="WebGL-output">
</div>

<script type="text/javascript">

    // 当页面加载完成时运行初始化函数, 完成绘制
    function init() {

        var stats = initStats();

        // 首先创建一个场景,各种元素都将添加到场景
        var scene = new THREE.Scene();

        // 创建一个我们的视角
        var camera = new THREE.PerspectiveCamera(45, window.innerWidth / window.innerHeight, 0.1, 1000);

        // 创建一个渲染器
        var renderer = new THREE.WebGLRenderer();
        renderer.setClearColorHex();
        renderer.setClearColor(new THREE.Color(0xEEEEEE));
        renderer.setSize(window.innerWidth, window.innerHeight);
        renderer.shadowMapEnabled = true;

        // 添加坐标轴到场景
        var axes = new THREE.AxisHelper(20);
        scene.add(axes);

        // 创建一个平面层
        var planeGeometry = new THREE.PlaneGeometry(60, 20);
        var planeMaterial = new THREE.MeshBasicMaterial({color: 0xcccccc});
        var plane = new THREE.Mesh(planeGeometry, planeMaterial);
        plane.receiveShadow = true;

        // 旋转并设置平面层位置
        plane.rotation.x = -0.5 * Math.PI;
        plane.position.x = 15;
        plane.position.y = 0;
        plane.position.z = 0;

        // 将平面层加入到场景
        scene.add(plane);

        // 创建一个正方体
        var cubeGeometry = new THREE.BoxGeometry(4, 4, 4);
        var cubeMaterial = new THREE.MeshLambertMaterial({color: 0xff0000});
        var cube = new THREE.Mesh(cubeGeometry, cubeMaterial);
        cube.castShadow = true;

        // 设置这个正方体的位置
        cube.position.x = -4;
        cube.position.y = 3;
        cube.position.z = 0;

        // 添加方体到场景中
        scene.add(cube);

        // 创建一个球体
        var sphereGeometry = new THREE.SphereGeometry(4, 20, 20);
        var sphereMaterial = new THREE.MeshLambertMaterial({color: 0x7777ff});
        var sphere = new THREE.Mesh(sphereGeometry, sphereMaterial);
        sphere.castShadow = true;

        // 设置球体的位置
        sphere.position.x = 20;
        sphere.position.y = 4;
        sphere.position.z = 4;

        // 添加球体到场景中
        scene.add(sphere);

        // 设置视角的位置
        camera.position.x = -30;
        camera.position.y = 40;
        camera.position.z = 30;
        camera.lookAt(scene.position);

        // 添加聚光灯
        var spotLight = new THREE.SpotLight(0xffffff);
        spotLight.position.set(-40, 60, -10);
        spotLight.castShadow = true;
        scene.add(spotLight);

        // 添加图形到div层
        document.getElementById("WebGL-output").appendChild(renderer.domElement);

        // 渲染场景
        var step = 0;

        // 定义一个运动速度的对象
        var controls = new function() {
          this.rotationSpeed = 0.02;
          this.bouncingSpeed = 0.03;
        }

        // 引入dat.GUI进行交互
        var gui = new dat.GUI();
        gui.add(controls, 'rotationSpeed', 0, 0.5);
        gui.add(controls, 'bouncingSpeed', 0, 0.5);

        renderScene();

        function renderScene() {

          stats.update();

          // 对正方体进行坐标变换
          cube.rotation.x += controls.rotationSpeed;
          cube.rotation.y += controls.rotationSpeed;
          cube.rotation.z += controls.rotationSpeed;

          // 对球进行坐标变换
          step += controls.bouncingSpeed;
          sphere.position.x = 20 + (10 * (Math.cos(step)));
          sphere.position.y = 2 + (10 * Math.abs(Math.sin(step)));

          // 使用requestAnimationFrame进行更新
          requestAnimationFrame(renderScene);
          renderer.render(scene, camera);
        }

        // 初始化状态器
        function initStats() {

          var stats = new Stats();

          stats.setMode(0); // 0: fps, 1: ms

          stats.domElement.style.position = 'absolute';
          stats.domElement.style.left = '0px';
          stats.domElement.style.top = '0px';

          document.getElementById('Stats-output').appendChild(stats.domElement);

          return stats;
        }
    }
    window.onload = init;

</script>
</body>
</html>